An Investigation of Image Size Reduction Algorithms
Full-size images require large amounts of disk space to store and bandwidth or
time to transmit and display. In many applications, a smaller version of an
image is sufficient.
For example, a catalog of images could include many "thumbnail"
images, each of which could be transmitted and displayed quickly.
These thumbnails would give the user a good enough idea of the full image that
they could choose the appropriate full-sized image to retrieve.
There are many ways in which a large image can be reduced in size.
- Cropping
- The simplest way in which to reduce an image's size is by cropping, i.e.
choosing only a certain portion of the image to view. This works well if one
region of an image contains all of the interesting information. Even then, it
requires a determination of what part of the image is important. This may be
an easy task for a human, but is very difficult for a computer.
- Pixel Skipping
- To eliminate the above problem, we can reduce the size of an image by
throwing out pixels evenly throughout an image. For example, if we wanted to
reduce the size of an image by half in each dimension, we could throw out every
other pixel. This method is fairly fast, but may produce artifacts,
especially in color images. If an image is dithered, for example, it may have
a regular pattern of two or more colors adjacent to each other in order to
produce the illusion of a different color (which wasn't available in the
color palette.) If we happen to throw out all of one of those colors, the
perceived color, and thus the overall look, of the image will change
drastically.
- Pixel Averaging
- In order to eliminate the problem of color artifacts as described above, we
can average adjacent pixels together instead of simply throwing them out as in
Pixel Skipping. However, this will take more time and may tend to blur the
image.
- Frequency Domain Processing
- A different approach to image size reduction involves looking at an
image in the frequency domain in the hopes that the useful information will be
more easily selected. For example, if an image was composed entirely of
low frequency components, the high frequency components would all be very
small in the frequency domain and we could truncate them. When the image was
transformed back to the spatial domain, it would be reduced in size by the
same factor as in the frequency domain. Note that for this example, the net
effect would be the same as Pixel Averaging. The advantage of Frequency
Domain Sampling is that it could also reduce the size of images with only
high-frequency content. In addition, if the frequency domain image was sampled
as in Pixel Skipping, then the image in the spatial domain would also be
reduced in size. The exact effects of this on the image are not obvious.
- Wavelet Decomposition
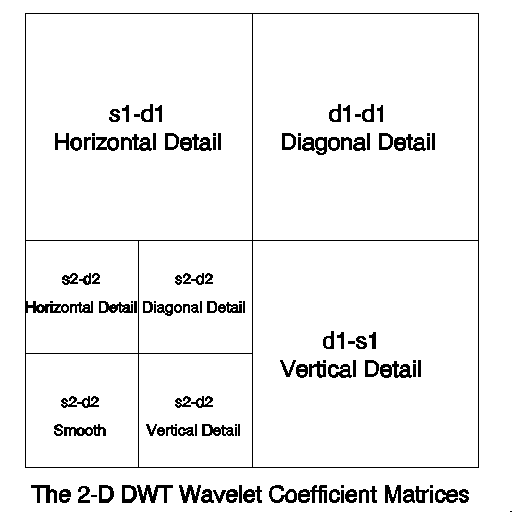
- The 2-D Discrete Wavelet Transform (DWT) offers another possible approach
to image size reduction. The DWT is a decimating transform which produces
a segmented image with different segments containing coefficients corresponding
to different levels of detail in the image. Each level of the DWT produces
four segments, one of which is a "smoothed" version of the image. The next
level of the DWT operates on that smoothed version. Thus successive levels of
the DWT produce a smaller and smaller (by a factor of 2 in each dimension)
version of the original image.

Note:
A color image can be thought of as three grey-scale images (Red, Green,
and Blue).
Any of the above algorithms must be applied to each of these images separately,
after which the images can be re-combined to form the complete image.
In order to investigate the above algorithms, I used several platforms. For
Cropping, Pixel Skipping, and Pixel Averaging, I used XV, an image display and
manipulation package. XV includes hooks for programmers to add their own code.
This allowed me to write the appropriate routines without having to worry about
writing code to load and display images. XV already implemented Cropping, and
I added Pixel Skipping and Pixel Averaging.
For the DWT, I used S-Plus with the Wavelets toolkit. I had to split the
color images up into their R, G, and B components in order to run the DWT on
them. I added a routine to XV to save images to separate files which S-Plus
could read (1 file for each of the three color components R, G, and B).
I also added a routine to load images which had been saved by S-Plus.
Note: All of the images shown below must be displayed by the software you are
using to view this document. Due to the large number of colors needed by
these images, unless you are using a true 24-bit color display (TrueColor or
DirectColor), the images will be dithered, so direct comparisons will be
difficult. To overcome this, each image is also a link to its file. If your
viewing software is set up to send GIF images to an external viewer (such as
XV), selecting each image will send it to a separate window. By setting each
separate window to use its own colormap, each image will be displayed correctly.
You will only be able to view one image at a time, because the colors
of the other images will be stolen by the image being viewed. However, by
switching from one image to the next you can compare them as best is possible.
I used three images to compare the effects of Pixel Skipping, Pixel Averaging,
and the 2-D decimating DWT.
Conclusions
Somehow this part of my report got sent to the great bit-bucket in the sky.
I'll rewrite it as soon as I get time...

